Ford Ecosport: Rear End Sheet Metal Repairs / Removal and Installation - Rear Exhaust Mounting Bracket
Special Tool(s) / General Equipment
| 8 mm Drill Bit | |
| MIG/MAG Welding Equipment | |
| Spot Weld Drill Bit | |
| Locking Pliers |
Removal
NOTE: Factory welds may be substituted with resistance or metal inert gas (MIG) plug welds. Resistance welds may not be placed directly over original location. They must be placed adjacent to original location and match factory welds in quantity. Metal inert gas (MIG) plug welds must equal factory welds in both location and quantity.
NOTE: Adequately protect all adjacent areas against cutting, grinding and welding procedures.
-
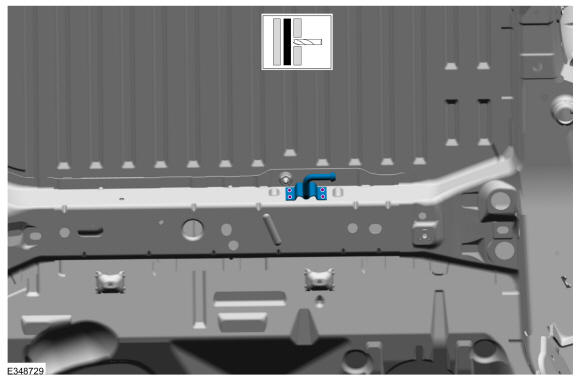
Position aside the exhaust.
-
Remove the welds and the exhaust bracket.
Use the General Equipment: Spot Weld Drill Bit
 |
Installation
NOTE: Factory welds may be substituted with resistance or metal inert gas (MIG) plug welds. Resistance welds may not be placed directly over original location. They must be placed adjacent to original location and match factory welds in quantity. Metal inert gas (MIG) plug welds must equal factory welds in both location and quantity.
NOTE: Adequately protect all adjacent areas against cutting, grinding and welding procedures.
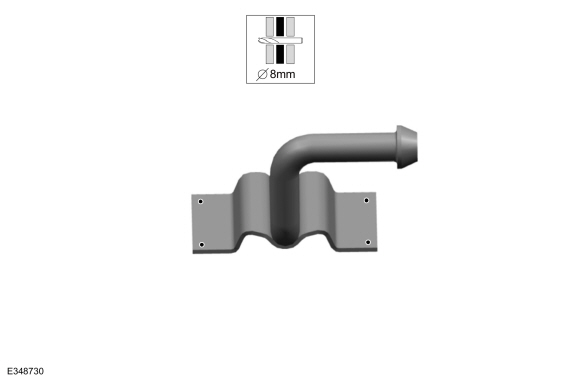
-
Drill plug weld holes in the replacement bracket.
Use the General Equipment: 8 mm Drill Bit
 |
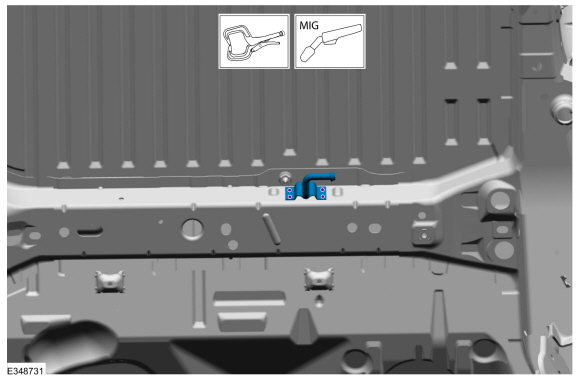
-
Install, properly position, clamp and weld the replacement exhaust bracket.
Use the General Equipment: Locking Pliers
Use the General Equipment: MIG/MAG Welding Equipment
 |
-
Refinish the entire repair using a Ford approved paint system.
-
Restore corrosion protection.
Refer to: Corrosion Prevention (501-25 Body Repairs - General Information, General Procedures).
-
Position and secure the exhaust in original location.
 Removal and Installation - Front Floor Panel Upper Rear Crossmember
Special Tool(s) /
General Equipment
8 mm Drill Bit
MIG/MAG Welding Equipment
Spot Weld Drill Bit
Locking Pliers
Materials
Name
Specification
Seam SealerTA-2-B, 3M™ 08308, LORD Fusor® 803DTM
-
Removal
NOTE:
Left hand (LH) side shown, right hand (RH) side similar...
 Removal and Installation - Rear Floor Panel
Special Tool(s) /
General Equipment
Scraper for Straight Edges
Spherical Cutter
Hot Air Gun
8 mm Drill Bit
MIG/MAG Welding Equipment
Spot Weld Drill Bit
Locking Pliers
Materials
Name
Specification
Seam SealerTA-2-B, 3M™ 08308, LORD Fusor® 803DTM
-
Removal
NOTE:
To minimize the intrusiveness..
Other information:
Ford Ecosport 2014-2026 Service and Repair Manual: Description and Operation - Seatbelt Systems - System Operation and Component Description
System Operation Emergency Locking Retractor (ELR) All retractors have an Emergency Locking Retractor (ELR) mode, which is a vehicle-sensitive feature designed to activate and lock the seatbelt webbing during hard braking, cornering, or an impact of approximately 24 kmh (14.9 mph). The Emergency Locking Retractor (ELR) feature helps reduce the forward movement of the driver and pa..
Ford Ecosport 2014-2026 Service and Repair Manual: Description and Operation - Rear View Mirrors - System Operation and Component Description
System Operation System Diagram - Exterior, Power Item Description 1 LH exterior mirror 2 Exterior mirror control switch 3 RH exterior mirror System Operation - Exterior, Power All functions of the power mirror feature are integrated into one switch module. The left and right side selection butt..
Categories
- Manuals Home
- 2nd Gen Ford Ecosport Service Manual (2014 - 2026)
- Removal and Installation - Front Seat
- General Procedures - Transmission Fluid Level Check
- Removal and Installation - Blower Motor
- Removal and Installation - Starter Motor
- Removal and Installation - Body Control Module (BCM)
Removal and Installation - Rear Halfshaft Seal
Special Tool(s) / General Equipment
 205-153
(T80T-4000-W)
205-153
(T80T-4000-W)
Handle
 205-990
Installer, Axle Seal
TKIT-2012A-FL
TKIT-2012A-ROW