Ford Ecosport: Automatic Transmission - 6-Speed Automatic Transmission – 6F35 / Removal and Installation - Transmission Fluid Auxiliary Pump
Ford Ecosport 2014-2026 Service and Repair Manual / Automatic Transmission / Automatic Transmission - 6-Speed Automatic Transmission – 6F35 / Removal and Installation - Transmission Fluid Auxiliary Pump
Special Tool(s) / General Equipment
| Hot Air Gun |
Removal
-
With the vehicle in NEUTRAL, position it on a hoist.
Refer to: Jacking and Lifting - Overview (100-02 Jacking and Lifting, Description and Operation).
-
If equipped, remove the engine undershield.
Refer to: Engine Undershield (501-02 Front End Body Panels, Removal and Installation).
-
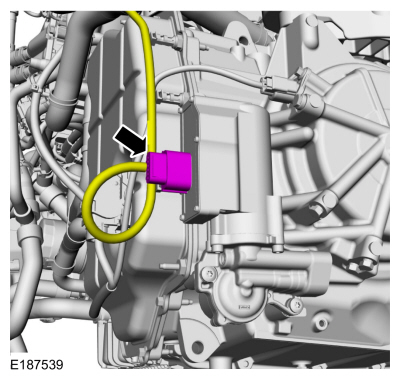
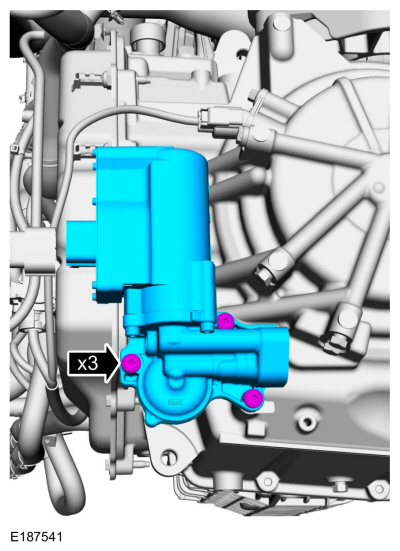
Disconnect the transmission fluid auxiliary pump electrical connector.
 |
-
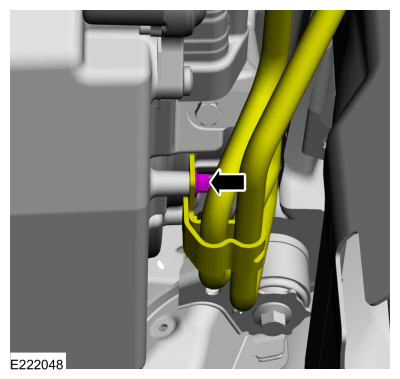
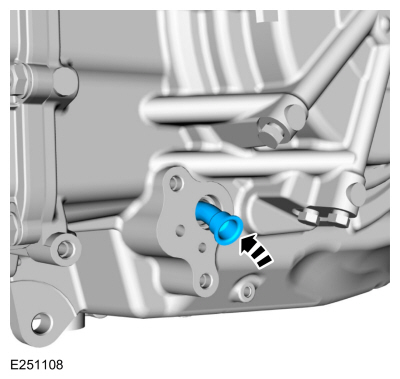
Remove the transmission fluid cooler tube bolt.
 |
-
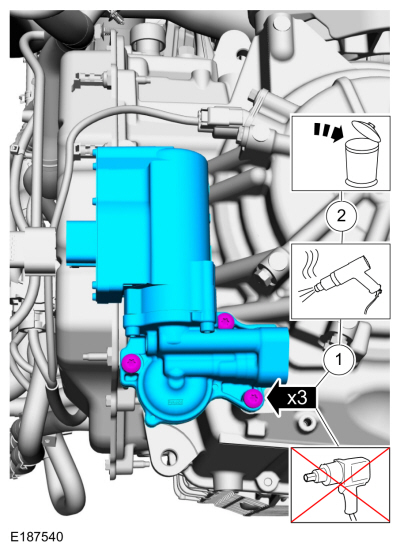
NOTICE: Do not use power tools to remove the transmission fluid auxiliary pump bolts or damage can occur.
NOTE: Be prepared to collect escaping fluid.
Remove the bolts and the transmission fluid auxiliary pump.
-
Apply heat to the bolts to soften the Loctite®.
Use the General Equipment: Hot Air Gun
-
Remove and discard the bolts.
-
Apply heat to the bolts to soften the Loctite®.
 |
-
Remove the transmission fluid auxiliary pump gasket.
 |
-
Remove the transmission fluid auxiliary pump supply tube assembly.
 |
-
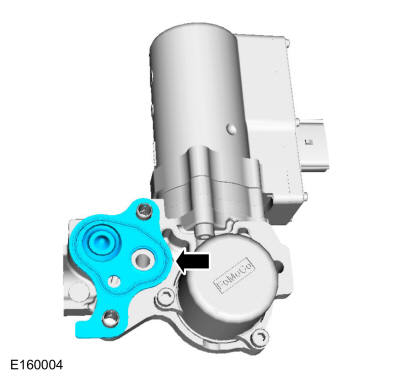
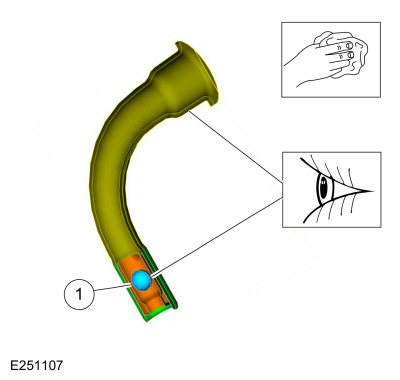
Clean and inspect the transmission fluid auxiliary pump supply tube and check ball.
-
Check ball (part of the transmission fluid auxiliary pump supply tube)
-
Check ball (part of the transmission fluid auxiliary pump supply tube)
 |
Installation
-
Install the transmission fluid auxiliary pump supply tube assembly.
 |
-
Install the transmission fluid auxiliary pump gasket.
|
-
Install the transmission fluid auxiliary pump and new bolts.
Torque: 115 lb.in (13 Nm)
 |
-
Install the transmission fluid cooler tube bolt.
Torque: 97 lb.in (11 Nm)
|
-
Connect the transmission fluid auxiliary pump electrical connector.
|
-
NOTE: TFT must be greater than 38ºC (100ºF) for the PCM to command the pump on.
Using the scan tool verify the TFT is above 38ºC (100ºF).
-
If TFT is below 38ºC (100ºF), run engine at 3000 RPM until specified temperature is achieved (approximately 2-4 minutes).
-
If TFT is below 38ºC (100ºF), run engine at 3000 RPM until specified temperature is achieved (approximately 2-4 minutes).
-
Prime the Transmission Fluid Auxiliary Pump.
-
Key ON, Engine OFF.
-
Using the scan tool, command TRANS_PMP_CMD to 80%
for 30 seconds. If the pump cannot be commanded on, verify TFT is above 38ºC (100ºF).
-
Clear DTCs.
-
Key ON, Engine OFF.
-
Carry out a road test until there is a stop / start
event. If the restart is harsh, repeat the Transmission Fluid Pump prime
procedure.
-
Continue road test and evaluate each stop / start event.
Repeat prime procedure until three consecutive normal stop / start
events are achieved.
-
Check the transmission fluid level.
Refer to: Transmission Fluid Level Check (307-01A Automatic Transmission - 6-Speed Automatic Transmission – 6F15, General Procedures).
-
If equipped, install the engine undershield.
Refer to: Engine Undershield (501-02 Front End Body Panels, Removal and Installation).
 Removal and Installation - Transmission Case Bushing
Removal
To remove the LH halfshaft bushing, transmission disassembly is required.
Refer to: Transmission (307-01A Automatic Transmission - 6-Speed Automatic Transmission – 6F15, Overhaul)...
 Removal and Installation - Transmission Internal Wiring Harness Frame
Special Tool(s) /
General Equipment
307-636Alignment Pins- Valve BodyTKIT-2008ET-FLMTKIT-2008ET-ROW
Removal
Remove the main control cover...
Other information:
Ford Ecosport 2014-2026 Service and Repair Manual: Diagnosis and Testing - Battery
General Equipment Diagnostic Battery Charger Use Ford approved battery test equipment. Midtronics MDX-650 or P-300/P-600/490/1050 Midtronics GRX-3590 or 3000 Midtronics EXP-890 Diagnostics in this manual assume a certain skill level and knowledge of Ford-specific diagnostic practices...
Ford Ecosport 2014-2026 Service and Repair Manual: Description and Operation - Noise, Vibration and Harshness
Sound Deadeners and Insulators NOTICE: Mastic is made of a combustible material and should be removed prior to carrying out welding procedures to the area. Heat zones from welding near mastic may cause the mastic material to burn. NOTICE: Corrosion protection must be restored to the area after the mastic material is applied...
Categories
- Manuals Home
- 2nd Gen Ford Ecosport Service Manual (2014 - 2026)
- Removal and Installation - Evaporative Emission Canister Purge Valve
- Removal and Installation - Rear Bumper
- Body and Paint
- General Procedures - Battery Charging
- Specifications
Removal and Installation - Wheel Knuckle Bushing
Special Tool(s) / General Equipment
Hydraulic PressRemoval
NOTE: Removal steps in this procedure may contain installation details.
Remove the wheel knuckle.Refer to: Wheel Knuckle - Vehicles With: Rear Drum Brakes (204-02B Rear Suspension - AWD, Removal and Installation).
Remove the rear toe adjustment retainers and remove the wheel knuckle mounting bracket.
Torque:
Stage 1: 177 lb.in (20 Nm)
Stage 2: 76 lb.ft (103 Nm)
Copyright © 2026 www.foecosport2.com