Ford Ecosport: Front End Sheet Metal Repairs / Removal and Installation - Fender Apron Panel Section
Special Tool(s) / General Equipment
| 8 mm Drill Bit | |
| MIG/MAG Welding Equipment | |
| Spot Weld Drill Bit | |
| Locking Pliers |
Materials
| Name | Specification |
|---|---|
| Seam Sealer TA-2-B, 3M™ 08308, LORD Fusor® 803DTM |
- |
Removal
NOTE: Factory welds may be substituted with resistance or metal inert gas (MIG) plug welds. Resistance welds may not be placed directly over original location. They must be placed adjacent to original location and match factory welds in quantity. Metal inert gas (MIG) plug welds must equal factory welds in both location and quantity.
NOTE: Adequately protect all adjacent areas against cutting, grinding and welding procedures.
NOTE: Left hand (LH) side shown, right hand (RH) side similar.
-
Depower the SRS .
Refer to: Supplemental Restraint System (SRS) Depowering (501-20B Supplemental Restraint System, General Procedures).
-
If Required:
Dimensionally restore the vehicle to pre-damage condition.
Refer to: Body and Frame (501-26 Body Repairs - Vehicle Specific Information and Tolerance Checks, Description and Operation).
-
Remove the A-Pillar upper reinforcement.
Refer to: A-Pillar Upper Reinforcement (501-29 Side Panel Sheet Metal Repairs, Removal and Installation).
-
Remove the Cowl Panel.
Refer to: Cowl Panel (501-27 Front End Sheet Metal Repairs, Removal and Installation).
-
position wiring harness away from the working area.
-
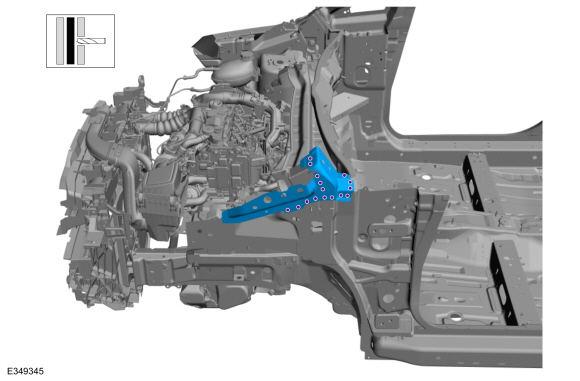
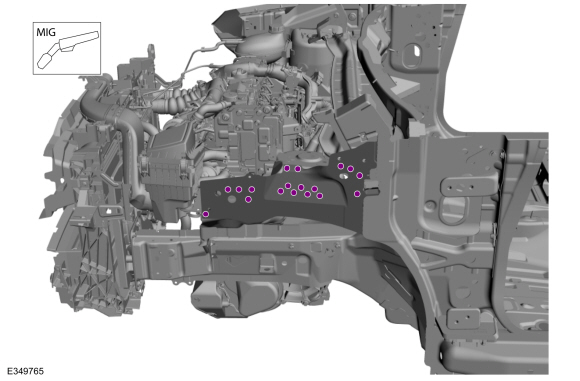
Remove the welds and the cowl side to front body pillar.
Use the General Equipment: Spot Weld Drill Bit
 |
-
Remove the welds.
Use the General Equipment: Spot Weld Drill Bit
 |
-
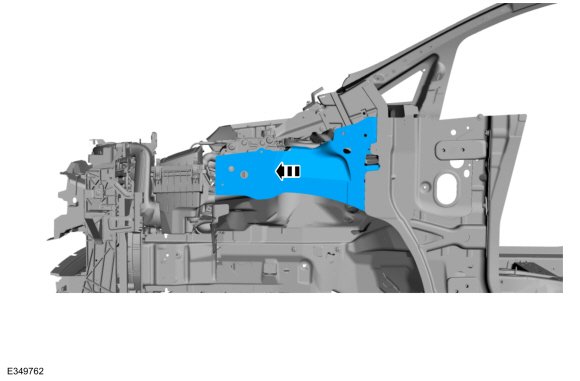
Remove the fender apron panel section.
 |
Installation
NOTE: Factory welds may be substituted with resistance or metal inert gas (MIG) plug welds. Resistance welds may not be placed directly over original location. They must be placed adjacent to original location and match factory welds in quantity. Metal inert gas (MIG) plug welds must equal factory welds in both location and quantity.
NOTE: Adequately protect all adjacent areas against cutting, grinding and welding procedures.
NOTE: Sealer or adhesive must not be applied in welding zones. Areas which were bonded or sealed needs to be thoroughly sealed afterwards.
NOTE: Left hand (LH) side shown, right hand (RH) side similar.
-
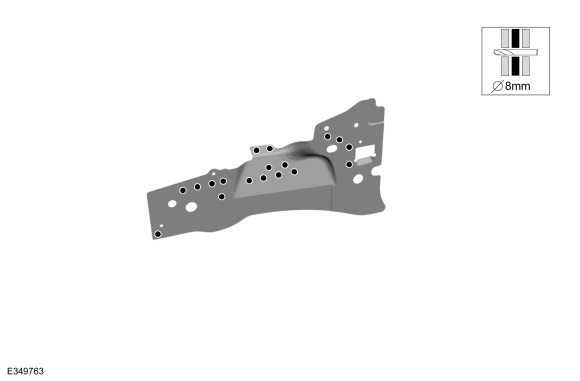
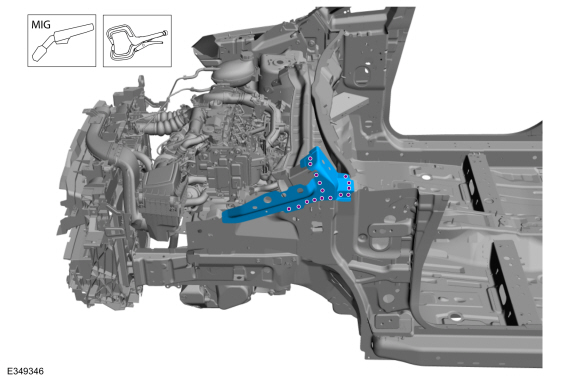
Drill holes in the replacement panel for plug welding.
Use the General Equipment: 8 mm Drill Bit
 |
-
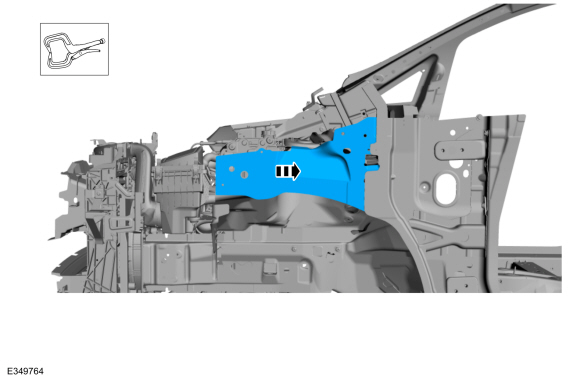
Install, properly position and fender apron panel section.
Use the General Equipment: Locking Pliers
 |
-
Install the welds.
Use the General Equipment: MIG/MAG Welding Equipment
 |
-
Install, properly position, clamp and weld the cowl side to front body pillar.
Use the General Equipment: Locking Pliers
Use the General Equipment: MIG/MAG Welding Equipment
 |
-
Metal finish all welds as required using typical metal finishing techniques and materials.
-
Seam Sealing:
All seams must be sealed to production level.
Material: Seam Sealer / TA-2-B, 3M™ 08308, LORD Fusor® 803DTM
-
Refinish the entire repair using a Ford approved paint system.
-
Restore corrosion protection.
Refer to: Corrosion Prevention (501-25 Body Repairs - General Information, General Procedures).
-
Reposition the wiring harness to original location.
-
Install the Cowl Panel.
Refer to: Cowl Panel (501-27 Front End Sheet Metal Repairs, Removal and Installation).
-
Install the A-Pillar upper reinforcement.
Refer to: A-Pillar Upper Reinforcement (501-29 Side Panel Sheet Metal Repairs, Removal and Installation).
-
Repower the SRS.
Refer to: Supplemental Restraint System (SRS) Repowering (501-20B Supplemental Restraint System, General Procedures).
 Removal and Installation - Fender Apron Panel Reinforcement
Special Tool(s) /
General Equipment
Resistance Spotwelding Equipment
Spherical Cutter
8 mm Drill Bit
MIG/MAG Welding Equipment
Spot Weld Drill Bit
Locking Pliers
Removal
NOTE:
The fender apron panel reinforcement is made of DP600 class
steel and may be sectioned...
 Removal and Installation - Front Side Member Section
Special Tool(s) /
General Equipment
Resistance Spotwelding Equipment
Spherical Cutter
Grinder
Air Body Saw
8 mm Drill Bit
MIG/MAG Welding Equipment
Spot Weld Drill Bit
Locking Pliers
Materials
Name
Specification
Seam SealerTA-2-B, 3M™ 08308, LORD Fusor® 803DTM
-
Removal
NOTICE:
The ..
Other information:
Ford Ecosport 2014-2026 Service and Repair Manual: Diagnosis and Testing - Diagnosis By Symptom
Symptom Chart(s) Symptom Chart: Automatic Transmission Diagnostics in this manual assume a certain skill level and knowledge of Ford-specific diagnostic practices. REFER to: Diagnostic Methods (100-00 General Information, Description and Operation). In most circumstances the PCM sets a DTC to help guide with diagnostics. Refer to the DTC Chart before using the Symptom Chart. ..
Ford Ecosport 2014-2026 Service and Repair Manual: Description and Operation - Exterior Lighting - System Operation and Component Description
System Operation Headlamps System Diagram Item Description 1 (without push button start) 2 (with push button start) 3 LH low beam 4 LH high beam 5 RH low beam 6 RH high beam 7 HS-CAN2 8 BCM 9 LH Headlamp 10 RH Headlamp 11 ..
Categories
- Manuals Home
- 2nd Gen Ford Ecosport Service Manual (2014 - 2026)
- Diagnosis and Testing - Body Control Module (BCM)
- Removal and Installation - Blower Motor
- Engine
- Removal and Installation - Front Seat
- Removal and Installation - Body Control Module (BCM)
Removal and Installation - Oil Pressure Switch
Materials
Name Specification Motorcraft® Thread Sealant with PTFETA-24-B WSK-M2G350-A2
Removal
NOTE: Removal steps in this procedure may contain installation details.
With the vehicle in NEUTRAL, position it on a hoist.Refer to: Jacking and Lifting - Overview (100-02 Jacking and Lifting, Description and Operation).
If equipped, remove the bolts and the underbody shield.