Ford Ecosport: Rear Drive Axle/Differential / Removal and Installation - Differential Rear Bushing
Ford Ecosport 2014-2026 Service and Repair Manual / Driveline / Rear Drive Axle/Differential / Removal and Installation - Differential Rear Bushing
Special Tool(s) / General Equipment
 |
204-598-01 Remover/Installer, Subframe Bushing Guide |
 |
205-271 Installer, Pivot Bushing |
| Transmission Jack | |
Removal
-
With the vehicle in NEUTRAL, position it on a hoist.
Refer to: Jacking and Lifting - Overview (100-02 Jacking and Lifting, Description and Operation).
-
Remove the rear halfshaft.
Refer to: Rear Halfshaft (205-05 Rear Drive Halfshafts, Removal and Installation).
-
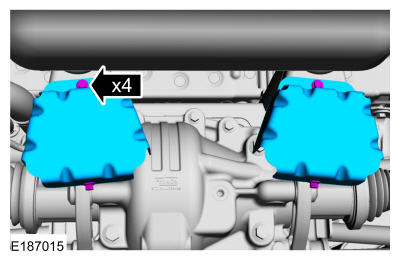
Remove bolts and the RDU rear damper covers.
 |
-
-
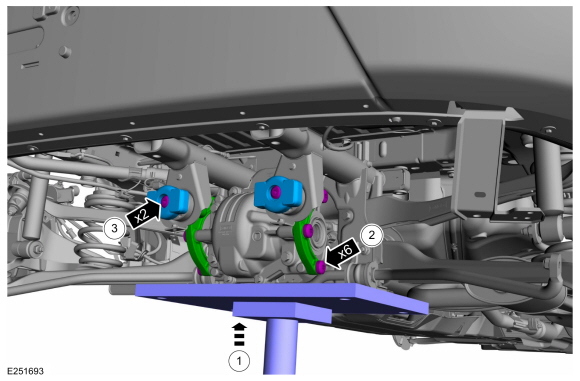
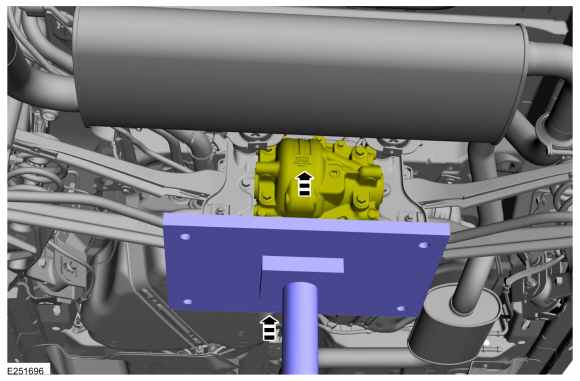
Position and secure a transmission jack under the RDU .
Use the General Equipment: Transmission Jack
-
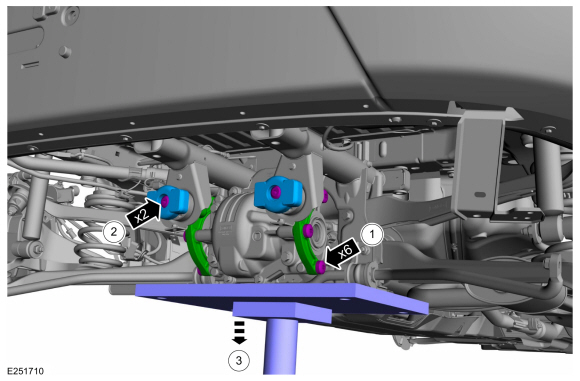
Remove the bolts and the RDU rear mounting brackets.
-
Remove the bolts and the RDU rear dampers.
-
Position and secure a transmission jack under the RDU .
 |
-
-
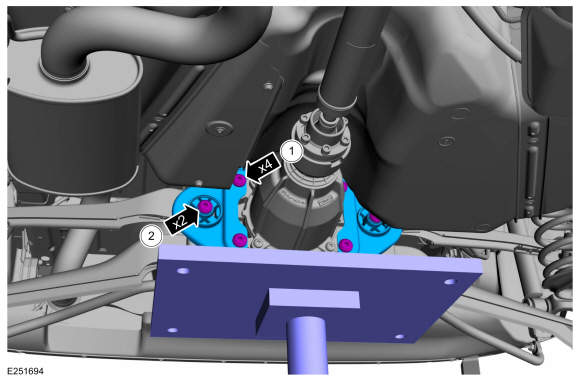
Remove the RDU front mounting bracket to the RDU bolts.
-
Remove the RDU front mounting bracket to member assembly bolts and the RDU mounting brackets.
Use the General Equipment: Transmission Jack
-
Remove the RDU front mounting bracket to the RDU bolts.
 |
-
Slowly lower the transmission jack and the RDU assembly.
Use the General Equipment: Transmission Jack
 |
-
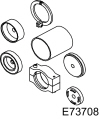
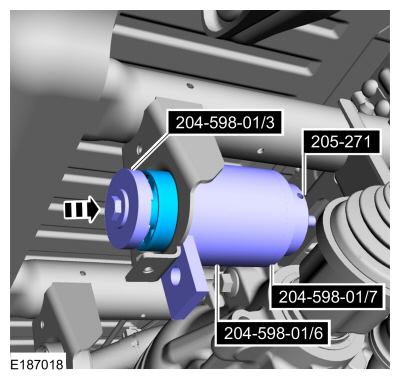
Using the special tool, remove the differential rear bushing.
Use Special Service Tool: 205-271 Installer, Pivot Bushing. , 204-598-01 Remover/Installer, Subframe Bushing Guide.
 |
Installation
-
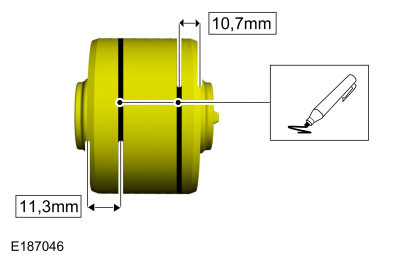
Mark on new differential rear bushing at specified distance.
 |
-
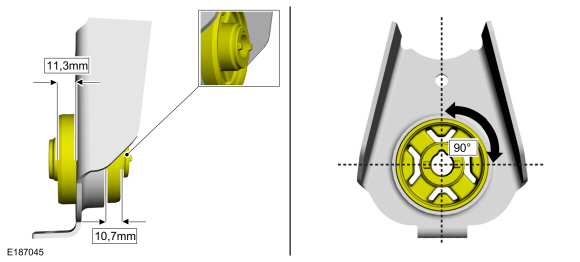
NOTE: Verify correct orientation on differential brackets, bushings must face away from the RDU assembly.
Install the differential rear bushing and ensure the distance marked.
 |
-
NOTE: Make sure that the installation marks are aligned.
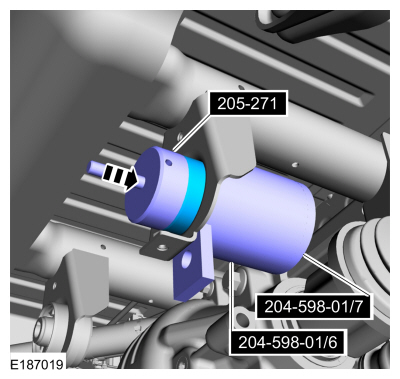
Using the special tool press the differential rear bushing.
Use Special Service Tool: 205-271 Installer, Pivot Bushing. , 204-598-01 Remover/Installer, Subframe Bushing Guide.
 |
-
Slowly raise the transmission jack and the RDU .
Use the General Equipment: Transmission Jack
 |
-
-
Install the RDU front mounting brackets and the bolts.
Torque: 66 lb.ft (90 Nm)
-
Install the RDU front mounting bracket to member assembly bolts.
Torque: 66 lb.ft (90 Nm)
-
Install the RDU front mounting brackets and the bolts.
|
-
-
Install the RDU rear mounting brackets and the bolts.
Torque: 66 lb.ft (90 Nm)
-
Install the RDU rear dampers and the mounting bolts.
Torque: 66 lb.ft (90 Nm)
-
Remove the transmission jack.
-
Install the RDU rear mounting brackets and the bolts.
 |
-
Install the RDU rear damper covers and the bolts.
Torque: 80 lb.in (9 Nm)
|
-
Install the rear halfshaft.
Refer to: Rear Halfshaft (205-05 Rear Drive Halfshafts, Removal and Installation).
 Removal and Installation - Axle Assembly
Removal
NOTE:
Removal steps in this procedure may contain installation details.
Remove the rear subframe - AWD.
Refer to: Rear Subframe - AWD (502-00 Uni-Body, Subframe and Mounting System, Removal and Installation)...
 Removal and Installation - Rear Halfshaft Seal
Special Tool(s) /
General Equipment
205-153
(T80T-4000-W)
Handle
205-990Installer, Axle SealTKIT-2012A-FLTKIT-2012A-ROW
Removal
NOTE:
Removal steps in this procedure may contain installation details...
Other information:
Ford Ecosport 2014-2026 Service and Repair Manual: Description and Operation - Evaporative Emissions - System Operation and Component Description
System Operation System Diagram Item Description 1 Valve cover 2 Air Cleaner (ACL) outlet pipe 3 Vapor ejector 4 EVAP (Evaporative Emission) canister purge valve 5 Intake manifold 6 PCV (Positive Crankcase Ventilation) valve 7 EVAP canister 8 Fuel vapor v..
Ford Ecosport 2014-2026 Service and Repair Manual: Diagnosis and Testing - Intermediate Clutch Assembly
Intermediate Clutch For intermediate (2,6) clutch operation, REFER to: Transmission Description (307-01B Automatic Transmission - 6-Speed Automatic Transmission – 6F35, Description and Operation). REFER to: Intermediate Clutch Assembly (307-01B Automatic Transmission - 6-Speed Automatic Transmission – 6F35, Description and Operation). Intermediate Clutch ..
Categories
- Manuals Home
- 2nd Gen Ford Ecosport Service Manual (2014 - 2026)
- General Procedures - Transmission Fluid Level Check
- Removal and Installation - Front Seat
- Removal and Installation - Starter Motor
- Diagnosis and Testing - Body Control Module (BCM)
- Body and Paint
Removal and Installation - Oil Pressure Switch
Materials
Name Specification Motorcraft® Thread Sealant with PTFETA-24-B WSK-M2G350-A2
Removal
NOTE: Removal steps in this procedure may contain installation details.
With the vehicle in NEUTRAL, position it on a hoist.Refer to: Jacking and Lifting - Overview (100-02 Jacking and Lifting, Description and Operation).
If equipped, remove the bolts and the underbody shield.
Copyright © 2026 www.foecosport2.com