Ford Ecosport: Rear End Sheet Metal Repairs / Removal and Installation - Water Drain Panel
Special Tool(s) / General Equipment
| Resistance Spotwelding Equipment | |
| 8 mm Drill Bit | |
| MIG/MAG Welding Equipment | |
| Spot Weld Drill Bit | |
| Locking Pliers |
Materials
| Name | Specification |
|---|---|
| Seam Sealer TA-2-B, 3M™ 08308, LORD Fusor® 803DTM |
- |
Removal
NOTE: The water drain panel is constructed of mild steel and may be sectioned provided sectioning is done 50 mm or more from hinge mount and restraint anchoring points. Adjust to meet repair needs.
NOTE: Factory welds may be substituted with resistance or metal inert gas (MIG) plug welds. Resistance welds may not be placed directly over original location. They must be placed adjacent to original location and match factory welds in quantity. Metal inert gas (MIG) plug welds must equal factory welds in both location and quantity.
NOTE: Left hand (LH) side shown, right hand (RH) side similar.
NOTE: Adequately protect all adjacent areas against cutting, grinding and welding procedures.
-
Depower the SRS .
Refer to: Supplemental Restraint System (SRS) Depowering (501-20B Supplemental Restraint System, General Procedures).
-
If required:
Dimensionally restore the vehicle to pre-damaged condition.
Refer to: Body and Frame (501-26 Body Repairs - Vehicle Specific Information and Tolerance Checks, Description and Operation).
-
Remove the following items:
-
Remove the Hinge.
Refer to: Luggage Compartment Lid Hinge (501-03 Body Closures, Removal and Installation).
-
Remove the quarter panel.
Refer to: Quarter Panel LH (501-30 Rear End Sheet Metal Repairs, Removal and Installation).
-
Remove the gusset.
Refer to: Inner Quarter Panel and Wheelhouse (501-30 Rear End Sheet Metal Repairs, Removal and Installation).
-
Remove the back panel.
Refer to: Back Panel (501-30 Rear End Sheet Metal Repairs, Removal and Installation).
-
Remove the Hinge.
-
Reposition the carpeting and the wiring harness away from the working area.
-
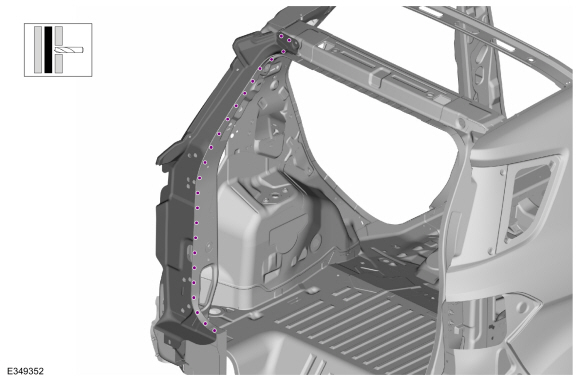
Remove the spot welds.
Use the General Equipment: Spot Weld Drill Bit
 |
-
Remove the water drain panel.
 |
Installation
NOTE: The water drain panel is constructed of mild steel and may be sectioned provided sectioning is done 50 mm or more from hinge mount and restraint anchoring points. Adjust to meet repair needs.
NOTE: Factory welds may be substituted with resistance or metal inert gas (MIG) plug welds. Resistance welds may not be placed directly over original location. They must be placed adjacent to original location and match factory welds in quantity. Metal inert gas (MIG) plug welds must equal factory welds in both location and quantity.
NOTE: Left hand (LH) side shown, right hand (RH) side similar.
NOTE: Adequately protect all adjacent areas against cutting, grinding and welding procedures.
-
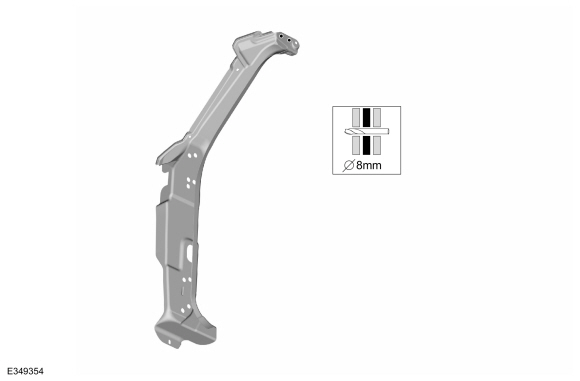
Drill 8 mm holes as indicated.
Use the General Equipment: 8 mm Drill Bit
 |
-
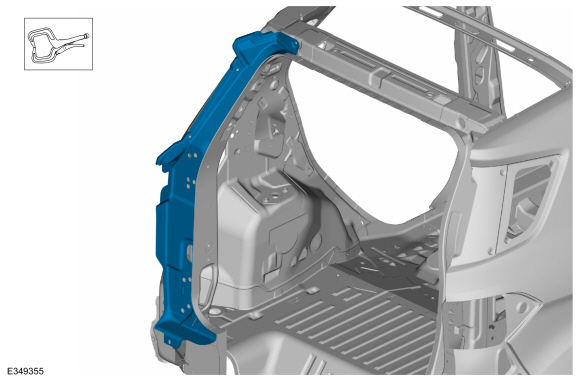
Install, properly position and seam the water drain panel.
Use the General Equipment: Locking Pliers
 |
-
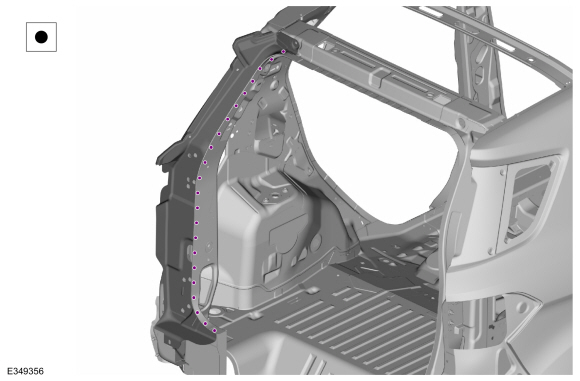
Install the welds.
Use the General Equipment: Resistance Spotwelding Equipment
 |
-
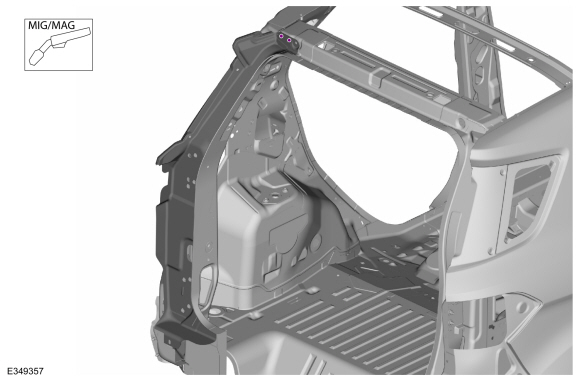
Install the welds.
Use the General Equipment: MIG/MAG Welding Equipment
 |
-
Metal finish as required using typical metal finishing techniques.
-
Sealing work:
All areas must be sealed to production level.
Material: Seam Sealer / TA-2-B, 3M™ 08308, LORD Fusor® 803DTM
-
Refinish the repair using a Ford approved paint system.
-
Restore corrosion protection.
Refer to: Corrosion Prevention (501-25 Body Repairs - General Information, General Procedures).
-
Reposition the carpeting and the wiring harness to original location.
-
Install the following items:
-
Install the back panel.
Refer to: Back Panel (501-30 Rear End Sheet Metal Repairs, Removal and Installation).
-
Install the gusset.
Refer to: Inner Quarter Panel and Wheelhouse (501-30 Rear End Sheet Metal Repairs, Removal and Installation).
-
Install the quarter panel.
Refer to: Quarter Panel LH (501-30 Rear End Sheet Metal Repairs, Removal and Installation).
-
Install the Hinge.
Refer to: Luggage Compartment Lid Hinge (501-03 Body Closures, Removal and Installation).
-
Install the back panel.
-
Align the liftgate as necessary.
Refer to: Liftgate Alignment (501-03 Body Closures, General Procedures).
-
Repower the SRS .
Refer to: Supplemental Restraint System (SRS) Repowering (501-20B Supplemental Restraint System, General Procedures).

 Removal and Installation - Water Drain Panel Reinforcement
Special Tool(s) /
General Equipment
Resistance Spotwelding Equipment
MIG/MAG Welding Equipment
Spot Weld Drill Bit
Locking Pliers
Materials
Name
Specification
Seam SealerTA-2-B, 3M™ 08308, LORD Fusor® 803DTM
-
Removal
NOTE:
The water drain panel is constructed of mild steel and may
be sectioned provided sectioni..
Other information:
Ford Ecosport 2014-2026 Service and Repair Manual: Removal and Installation - Wheel and Tire
Materials Name Specification Motorcraft® High Temperature Nickel Anti-Seize LubricantXL-2 - Removal With the vehicle in NEUTRAL, position it on a hoist. Refer to: Jacking and Lifting - Overview (100-02 Jacking and Lifting, Description and Operation). NOTICE: Do not use heat to loosen a seized wheel nut or damage to the..
Ford Ecosport 2014-2026 Service and Repair Manual: General Procedures - Front Toe Adjustment
Special Tool(s) / General Equipment Wheel Alignment System Adjustment NOTE: Make sure that the vehicle is standing on a level surface. NOTICE: Make sure that the steering wheel lock is engaged. NOTE: Make sure that the road wheels are in the straight ahead position. Steering wheel in straight ahead position. ..
Categories
- Manuals Home
- 2nd Gen Ford Ecosport Service Manual (2014 - 2026)
- General Procedures - Battery Charging
- Removal and Installation - Fuel Pump and Sender Unit
- Automatic Transmission - 6-Speed Automatic Transmission – 6F35
- Removal and Installation - Starter Motor
- Removal and Installation - Blower Motor
Removal and Installation - Wheel Knuckle Bushing
Special Tool(s) / General Equipment
Hydraulic PressRemoval
NOTE: Removal steps in this procedure may contain installation details.
Remove the wheel knuckle.Refer to: Wheel Knuckle - Vehicles With: Rear Drum Brakes (204-02B Rear Suspension - AWD, Removal and Installation).
Remove the rear toe adjustment retainers and remove the wheel knuckle mounting bracket.
Torque:
Stage 1: 177 lb.in (20 Nm)
Stage 2: 76 lb.ft (103 Nm)