Ford Ecosport: Front Seats / Removal and Installation - Front Seat
Removal
 WARNING:
The following procedure describes critical repair steps
required for correct seat component installation. Follow all notes and
steps carefully. Do not place any objects between the seat components
and the body of the vehicle, nor any objects within a joint internal to
the seat structure. Failure to follow step instructions may result in
incorrect operation of the seat components and increases the risk of
serious personal injury.
WARNING:
The following procedure describes critical repair steps
required for correct seat component installation. Follow all notes and
steps carefully. Do not place any objects between the seat components
and the body of the vehicle, nor any objects within a joint internal to
the seat structure. Failure to follow step instructions may result in
incorrect operation of the seat components and increases the risk of
serious personal injury.
NOTE: Removal steps in this procedure may contain installation details.
NOTE: LHD driver seat shown, RHD driver seat similar.
-
Refer to: Pyrotechnic Device Health and Safety Precautions (100-00 General Information, Description and Operation).
WARNING:
Before beginning any service procedure in this
manual, refer to health and safety warnings in section 100-00 General
Information. Failure to follow this instruction may result in serious
personal injury.
-
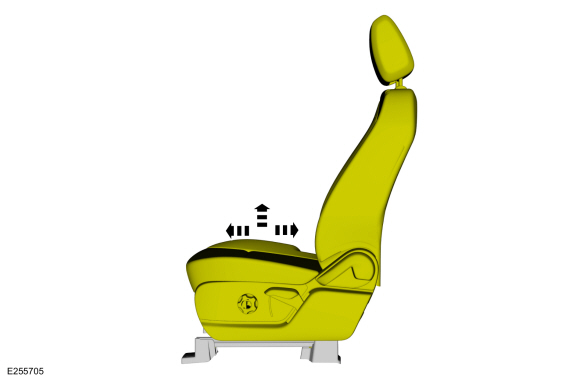
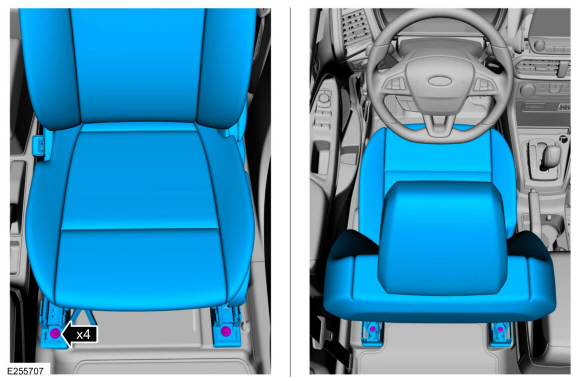
Move the seat to the full upward position and forward or rearward to access all the front seat bolts.
 |
-
Depower the SRS .
Refer to: Supplemental Restraint System (SRS) Depowering (501-20B Supplemental Restraint System, General Procedures).
Type 1
-
-
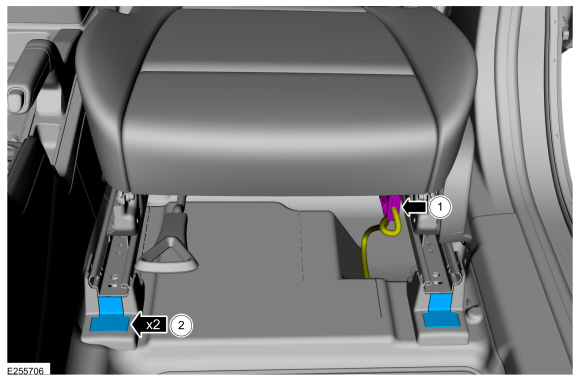
Disconnect the front seat harness electrical connector.
-
Remove the front seat bolt covers.
-
Disconnect the front seat harness electrical connector.
 |
Type 2
-
-
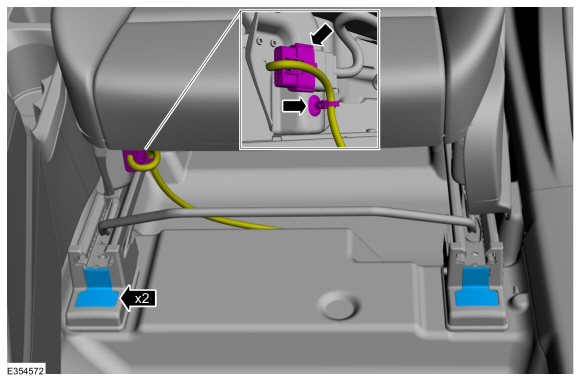
Disconnect the front seat harness electrical connector and detach the retainer.
-
Remove the front seat bolt covers.
-
Disconnect the front seat harness electrical connector and detach the retainer.
 |
All vehicles
-
Remove the bolts and the front seat.
Torque: 26 lb.ft (35 Nm)
 |
Installation
-
To install, reverse the removal procedure.
-
Repower the SRS .
Refer to: Supplemental Restraint System (SRS) Repowering (501-20B Supplemental Restraint System, General Procedures).
 Removal and Installation - Front Head Restraint Guide Sleeve
Special Tool(s) /
General Equipment
Flat Headed Screw Driver
Removal
NOTE:
Typical head restraint guide sleeve shown, others similar...
 Removal and Installation - Front Seat Backrest Cover
Special Tool(s) /
General Equipment
Hog Ring Plier
Removal
WARNING:
Front seat backrest trim covers installed on seats equipped
with seat side airbags cannot be repaired...
Other information:
Ford Ecosport 2014-2026 Service and Repair Manual: Diagnosis and Testing - Pinpoint Test - DTC: M, Vehicles With: Rear Seat Side Airbag
B0082:11, B0082:12, B0082:13, B0082:1A Refer to Wiring Diagrams Cell 46 for schematic and connector information. Normal Operation and Fault Conditions The RCM continuously monitors the passenger seatbelt load limiter circuits for the following faults: Resistance out of range Unexpected voltage Short to ground Faulted passenger seatbelt load limite..
Ford Ecosport 2014-2026 Service and Repair Manual: Removal and Installation - Parking Assist Control Module (PAM)
Removal NOTE: Removal steps in this procedure may contain installation details. NOTE: If installing a new module, it is necessary to upload the module configuration information to the scan tool prior to removing the module. This information must be downloaded into the new module after installation. Using a diagnostic scan tool, begin the PMI process for the PAM fol..
Categories
- Manuals Home
- 2nd Gen Ford Ecosport Service Manual (2014 - 2026)
- Specifications
- Automatic Transmission - 6-Speed Automatic Transmission – 6F35
- Removal and Installation - Front Seat
- Description and Operation - Evaporative Emissions - System Operation and Component Description
- Removal and Installation - Blower Motor
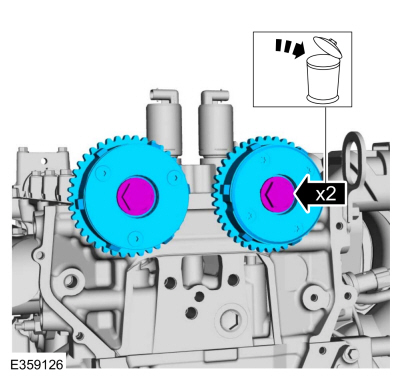
Removal and Installation - Variable Camshaft Timing (VCT) Unit
Removal
NOTICE: During engine repair procedures, cleanliness is extremely important. Any foreign material, including any material created while cleaning gasket surfaces, that enters the oil passages, coolant passages or the oil pan can cause engine failure.
Remove the timing chain.Refer to: Timing Chain (303-01C Engine - 2.0L Duratec-HE (129kW/175PS), Removal and Installation).
Remove the bolts and VCT units.
Discard the bolts.