Ford Ecosport: Rear End Sheet Metal Repairs / Removal and Installation - Rear Floor Panel Crossmember
Special Tool(s) / General Equipment
| 8 mm Drill Bit | |
| MIG/MAG Welding Equipment | |
| Spot Weld Drill Bit | |
| Locking Pliers |
Materials
| Name | Specification |
|---|---|
| Seam Sealer TA-2-B, 3M™ 08308, LORD Fusor® 803DTM |
- |
Removal
NOTE: Factory welds may be substituted with resistance or metal inert gas (MIG) plug welds. Resistance welds may not be placed directly over original location. They must be placed adjacent to original location and match factory welds in quantity. Metal inert gas (MIG) plug welds must equal factory welds in both location and quantity.
NOTE: Adequately protect all adjacent areas against cutting, grinding and welding procedures.
-
Depower the SRS .
Refer to: Supplemental Restraint System (SRS) Depowering (501-20B Supplemental Restraint System, General Procedures).
-
If Required:
Dimensionally restore the vehicle to pre-damage condition.
Refer to: Body and Frame (501-26 Body Repairs - Vehicle Specific Information and Tolerance Checks, Description and Operation).
-
If Required:
Remove the rear subframe or the beam axle.
Refer to: Rear Subframe - AWD (502-00 Uni-Body, Subframe and Mounting System, Removal and Installation).
Refer to: Beam Axle - Vehicles With: Rear Drum Brakes (204-02A Rear Suspension - FWD, Removal and Installation).
Refer to: Beam Axle - Vehicles With: Rear Disc Brakes (204-02A Rear Suspension - FWD, Removal and Installation).
-
Remove the fuel tank.
Refer to: Fuel Tank (310-01A Fuel Tank and Lines - 1.0L EcoBoost (92kW/125PS), Removal and Installation).
Refer to: Fuel Tank - LHD FWD/RHD FWD (310-01B Fuel Tank and Lines - 1.5L Duratec (90kW/120PS) – I3, Removal and Installation).
Refer to: Fuel Tank (310-01C Fuel Tank and Lines - 2.0L Duratec-HE (129kW/175PS), Removal and Installation).
-
Position all fuel and brake lines away from the working area.
-
Remove the rear exhaust mounting bracket.
Refer to: Rear Exhaust Mounting Bracket (501-30 Rear End Sheet Metal Repairs, Removal and Installation).
-
Remove the nut.
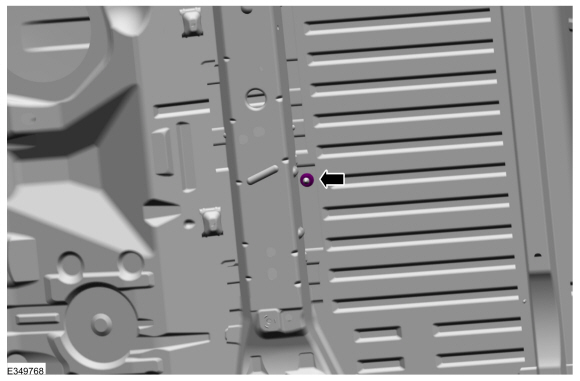 |
-
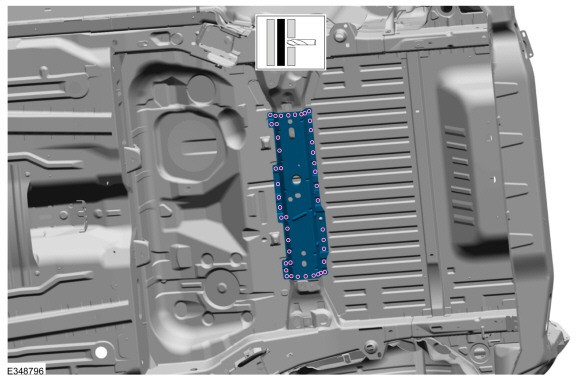
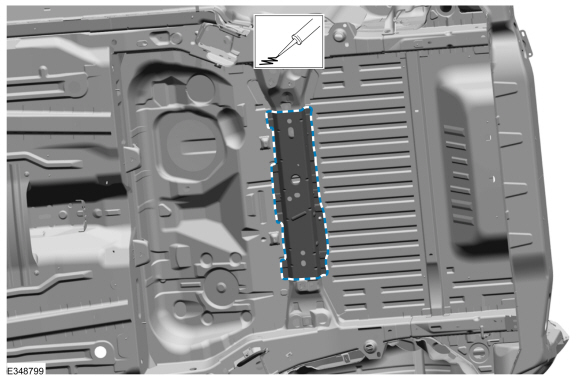
NOTE: Pay particular attention to the location of adhesives and sealers to aid in installation.
Remove the welds and the rear floor panel crossmember.
Use the General Equipment: Spot Weld Drill Bit
 |
Installation
NOTE: Factory welds may be substituted with resistance or metal inert gas (MIG) plug welds. Resistance welds may not be placed directly over original location. They must be placed adjacent to original location and match factory welds in quantity. Metal inert gas (MIG) plug welds must equal factory welds in both location and quantity.
NOTE: Adequately protect all adjacent areas against cutting, grinding and welding procedures.
-
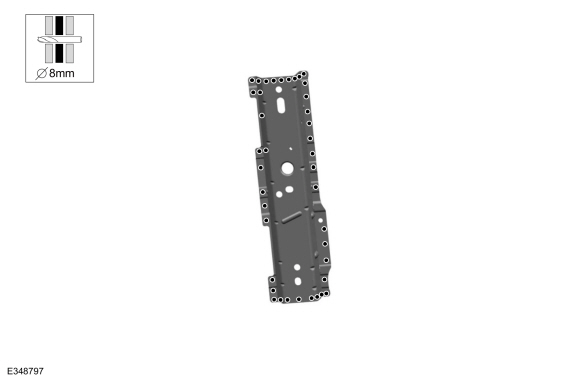
Drill plug weld holes in the replacement crossmember.
Use the General Equipment: 8 mm Drill Bit
 |
-
Install, properly position, clamp and weld the replacement crossmember.
Use the General Equipment: Locking Pliers
Use the General Equipment: MIG/MAG Welding Equipment
 |
-
Dress all welds as required using typical metal finishing techniques.
-
Seam Sealing:
All seams must be sealed to production level.
Material: Seam Sealer / TA-2-B, 3M™ 08308, LORD Fusor® 803DTM
 |
-
Install the nut.
|
-
Install the rear exhaust mounting bracket.
Refer to: Rear Exhaust Mounting Bracket (501-30 Rear End Sheet Metal Repairs, Removal and Installation).
-
Refinish the entire repair using a Ford approved paint system.
-
Restore corrosion protection.
Refer to: Corrosion Prevention (501-25 Body Repairs - General Information, General Procedures).
-
Install the fuel tank.
Refer to: Fuel Tank (310-01A Fuel Tank and Lines - 1.0L EcoBoost (92kW/125PS), Removal and Installation).
Refer to: Fuel Tank - LHD FWD/RHD FWD (310-01B Fuel Tank and Lines - 1.5L Duratec (90kW/120PS) – I3, Removal and Installation).
Refer to: Fuel Tank (310-01C Fuel Tank and Lines - 2.0L Duratec-HE (129kW/175PS), Removal and Installation).
-
Reposition all fuel and brake lines to original locations
-
If Required:
Install the rear subframe or the beam axle.
Refer to: Rear Subframe - AWD (502-00 Uni-Body, Subframe and Mounting System, Removal and Installation).
Refer to: Beam Axle - Vehicles With: Rear Drum Brakes (204-02A Rear Suspension - FWD, Removal and Installation).
Refer to: Beam Axle - Vehicles With: Rear Disc Brakes (204-02A Rear Suspension - FWD, Removal and Installation).
-
Repower the SRS .
Refer to: Supplemental Restraint System (SRS) Repowering (501-20B Supplemental Restraint System, General Procedures).

 Removal and Installation - Rear Floor Panel Reinforcement
Special Tool(s) /
General Equipment
8 mm Drill Bit
MIG/MAG Welding Equipment
Spot Weld Drill Bit
Locking Pliers
Removal
NOTE:
Factory welds may be substituted with resistance or metal
inert gas (MIG) plug welds...
Other information:
Ford Ecosport 2014-2026 Service and Repair Manual: Removal and Installation - Roof Opening Panel Front Drain Hose
Removal NOTE: Removal steps in this procedure may contain installation details. NOTE: LH side shown, RH side similar. Remove the headliner. Refer to: Headliner (501-05 Interior Trim and Ornamentation, Removal and Installation)...
Ford Ecosport 2014-2026 Service and Repair Manual: Removal and Installation - Hydraulic Control Unit (HCU)
Removal NOTE: Removal steps in this procedure may contain installation details. NOTE: A new HCU is equipped with a new ABS module. NOTE: The PMI process must begin with the current ABS module installed. If the current ABS module does not respond to the diagnostic scan tool, the tool may prompt for As-Built Data as part of the repair...
Categories
- Manuals Home
- 2nd Gen Ford Ecosport Service Manual (2014 - 2026)
- Removal and Installation - Blower Motor
- Removal and Installation - Starter Motor
- Description and Operation - Evaporative Emissions - System Operation and Component Description
- Removal and Installation - Evaporative Emission Canister Purge Valve
- Diagnosis and Testing - Evaporative Emissions
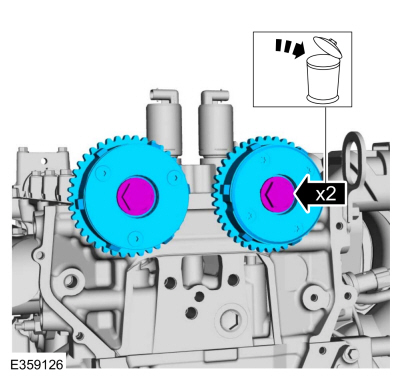
Removal and Installation - Variable Camshaft Timing (VCT) Unit
Removal
NOTICE: During engine repair procedures, cleanliness is extremely important. Any foreign material, including any material created while cleaning gasket surfaces, that enters the oil passages, coolant passages or the oil pan can cause engine failure.
Remove the timing chain.Refer to: Timing Chain (303-01C Engine - 2.0L Duratec-HE (129kW/175PS), Removal and Installation).
Remove the bolts and VCT units.
Discard the bolts.